
Introduction
In this article I will be analyzing a recent Bumblebee campaign that impersonates DocuSign. I will cover the execution chain, the PowerShell loader, and some Indicators of Compromise (IOCs).
Context
BumbleBee is a malware loader. A loader like this is early-stage malware: once it runs, it contacts its command-and-control (C2) servers and downloads whatever the operators want to run next, commonly a post-exploitation framework such as Cobalt Strike or another malware family. A loader infection is therefore usually the start of an intrusion, not the end of it.
The Sample
The lure is classic malvertising with a .zip and a password into a .img (not to be confused with an actual image extension like .jpg or .png)
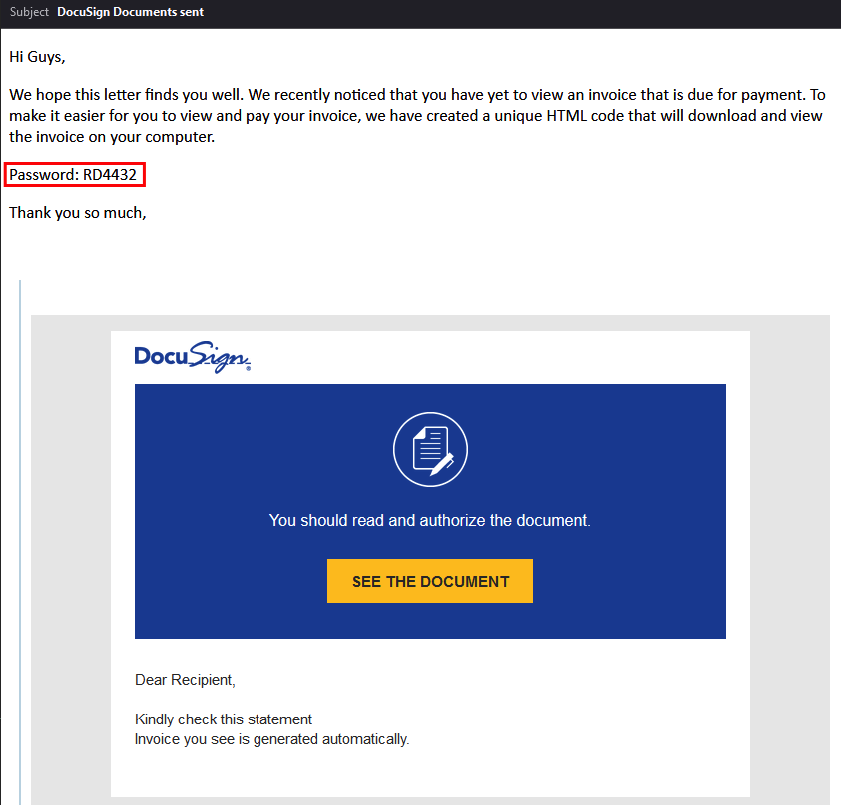
Hovering over the “See The Document” link reveals the URL:
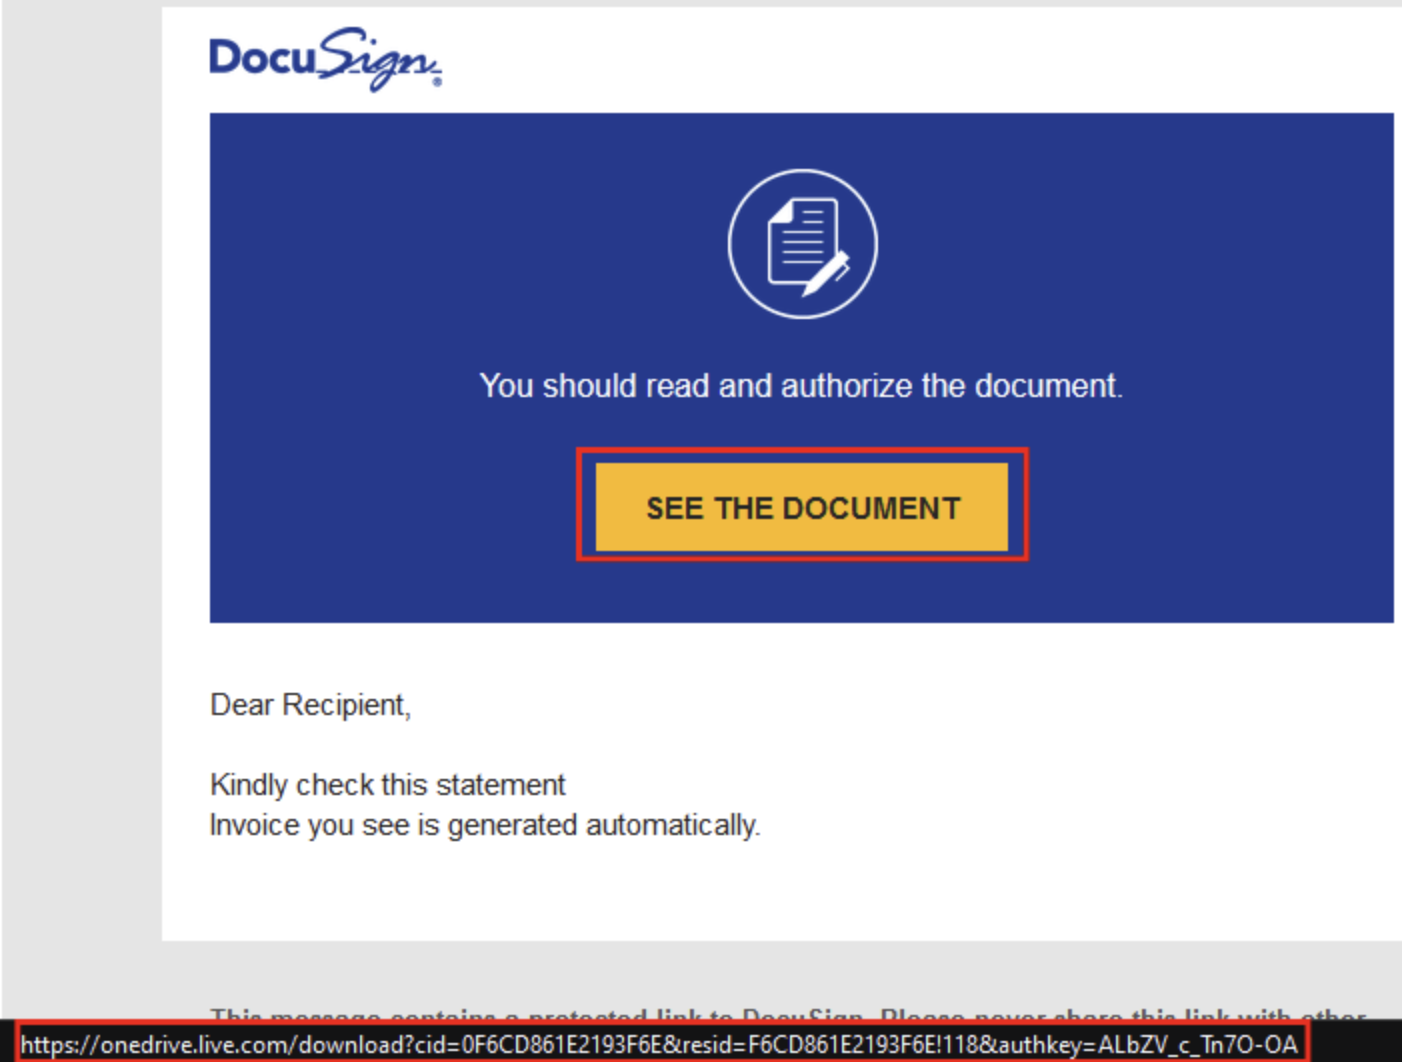
The de-horned URL is:
hxxps://onedrive.live[.]com/download?cid=0F6CD861E2193F6E&resid=F6CD861E2193F6E%21118&authkey=ALbZV_c_Tn7O-OA
Instead of redirecting to the actual DocuSign site, the file is hosted on OneDrive, triggering an automatic download of an archive file upon clicking.
Threat Chain
Below is the execution chain as I mapped it, from the moment the phishing email is opened:
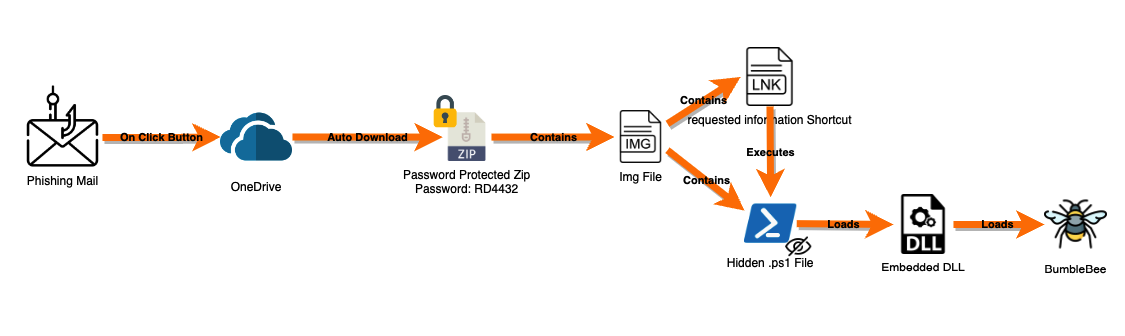
Let’s quickly go through these steps:
- The downloaded archive is opened by the user. To extract the IMG file, the user must enter the provided password:
RD4432.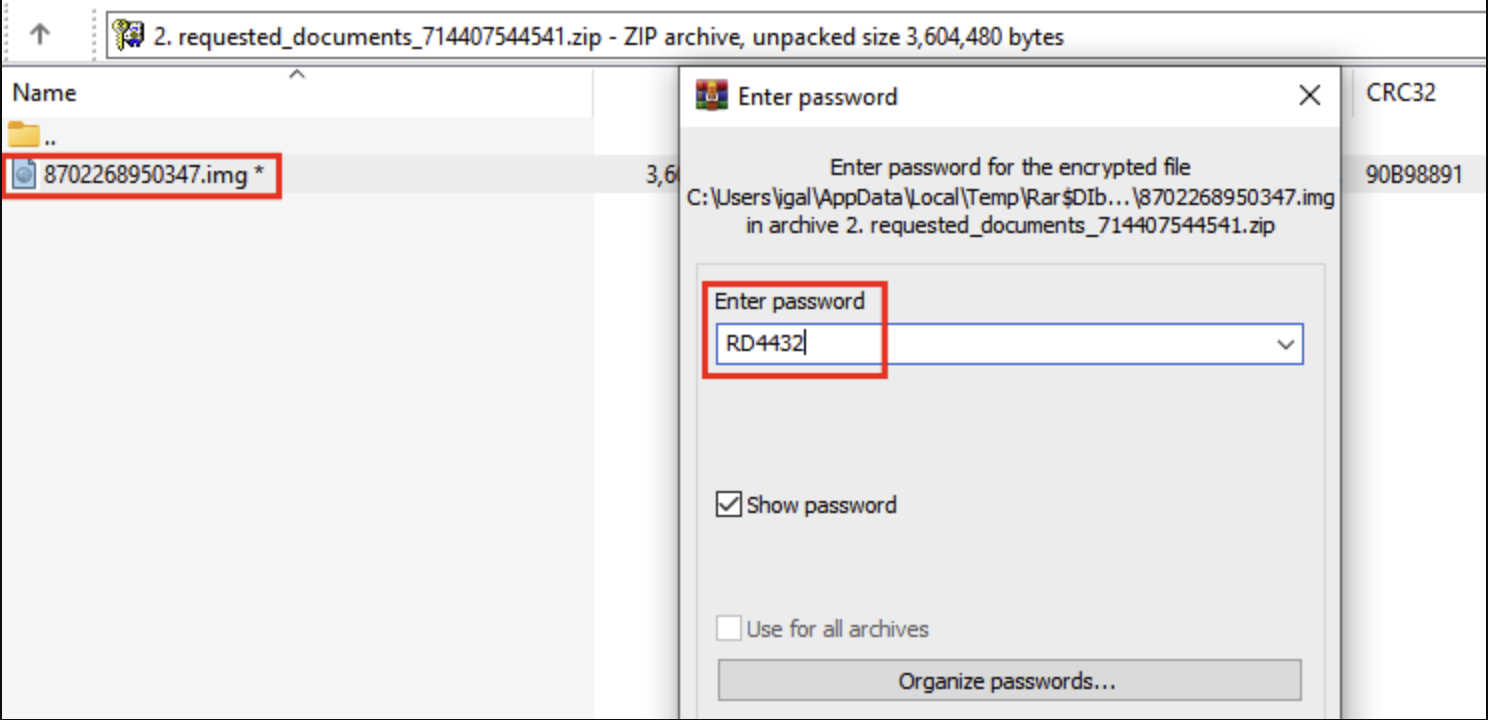
WinRAR asks for the password before extracting the IMG - Once the IMG file is opened, the user sees only the LNK file (the
.ps1script is hidden).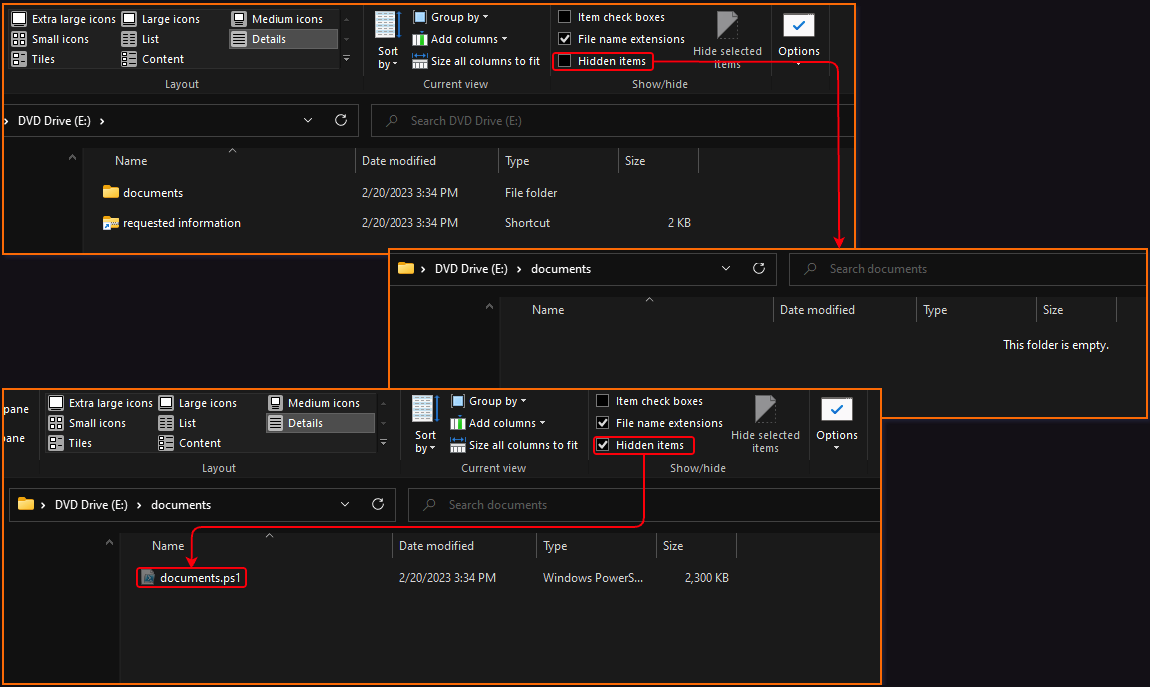
The mounted image with hidden items off (top) and on (bottom) - The LNK file will execute the hidden
.ps1script
Context
An .img file is a raw disk image. Since Windows 8, double-clicking one mounts it as a virtual drive, which Explorer lists as a DVD drive. Disk images are a popular delivery container because the files inside them have historically not inherited the Mark-of-the-Web, the Zone.Identifier stream that browsers and mail clients add to downloaded files, which is what triggers SmartScreen and Office Protected View warnings. The archive password adds a second layer: a mail or web gateway cannot look inside an encrypted archive without it. The .lnk file is an ordinary Windows shortcut: its target can be any program with arguments, such as powershell.exe and a script path, and Explorer never shows the .lnk extension, even with file name extensions turned on.
BumbleBee PowerShell .ps1
Now I turn to the script and the method used to extract the payload. The script contains approximately 42 base64 encoded strings (archives), each stored in a variable named elem{X}. For example:

$elem41The script replaces the first character in each encoded string with 'H' to match the .gz magic bytes: 1f 8b.

$elem41Context
A gzip stream starts with the magic bytes 1f 8b and the deflate method byte 08, which together encode in base64 as H4sI, so changing the first character of the string is enough to break or restore the header. Splitting a payload into dozens of small encoded chunks with broken headers is a common way to frustrate static scanning: no single string decodes to a recognizable file, so signatures written for a gzip header or an executable have nothing to match until the script rebuilds the payload at run time.
Here’s the Python script I used to extract, decode, and save these strings:
from base64 import b64decode
import re
import os

PS1_FILE_PATH = '/Users/igal/malwares/bumblebee/21-02-2023/documents.ps1'
OUTPUT_FOLDER = '/Users/igal/malwares/bumblebee/21-02-2023/archives/'

REG_PATTERN = '^\$elem.*\=\"(.*)\"$'

archiveIndex = 0

if not os.path.exists(OUTPUT_FOLDER):
    os.makedirs(OUTPUT_FOLDER)

ps1File = open(PS1_FILE_PATH, 'rb').readlines()
for line in ps1File:
    regMatch = re.findall(REG_PATTERN, line.replace(b'\x00',b'').decode('iso-8859-1'))
    if regMatch:
        varData = b64decode('H' + regMatch[0][1:])
        open(f'{OUTPUT_FOLDER}/archive{archiveIndex}.gz', 'wb').write(varData)
        print(f'[+] gz archive was created in:{OUTPUT_FOLDER}/archive{archiveIndex}.gz')
        archiveIndex += 1
This results in multiple .gz archives being created:
[+] gz archive was created in:/Users/igal/malwares/bumblebee/21-02-2023/archives//archive0.gz
[+] gz archive was created in:/Users/igal/malwares/bumblebee/21-02-2023/archives//archive1.gz
[+] gz archive was created in:/Users/igal/malwares/bumblebee/21-02-2023/archives//archive2.gz
[+] gz archive was created in:/Users/igal/malwares/bumblebee/21-02-2023/archives//archive3.gz
[+] gz archive was created in:/Users/igal/malwares/bumblebee/21-02-2023/archives//archive4.gz
[+] gz archive was created in:/Users/igal/malwares/bumblebee/21-02-2023/archives//archive5.gz
[+] gz archive was created in:/Users/igal/malwares/bumblebee/21-02-2023/archives//archive6.gz
[+] gz archive was created in:/Users/igal/malwares/bumblebee/21-02-2023/archives//archive7.gz
[+] gz archive was created in:/Users/igal/malwares/bumblebee/21-02-2023/archives//archive8.gz
[+] gz archive was created in:/Users/igal/malwares/bumblebee/21-02-2023/archives//archive9.gz
[+] gz archive was created in:/Users/igal/malwares/bumblebee/21-02-2023/archives//archive10.gz
[+] gz archive was created in:/Users/igal/malwares/bumblebee/21-02-2023/archives//archive11.gz
[+] gz archive was created in:/Users/igal/malwares/bumblebee/21-02-2023/archives//archive12.gz
[+] gz archive was created in:/Users/igal/malwares/bumblebee/21-02-2023/archives//archive13.gz
[+] gz archive was created in:/Users/igal/malwares/bumblebee/21-02-2023/archives//archive14.gz
[+] gz archive was created in:/Users/igal/malwares/bumblebee/21-02-2023/archives//archive15.gz
[+] gz archive was created in:/Users/igal/malwares/bumblebee/21-02-2023/archives//archive16.gz
[+] gz archive was created in:/Users/igal/malwares/bumblebee/21-02-2023/archives//archive17.gz
[+] gz archive was created in:/Users/igal/malwares/bumblebee/21-02-2023/archives//archive18.gz
[+] gz archive was created in:/Users/igal/malwares/bumblebee/21-02-2023/archives//archive19.gz
[+] gz archive was created in:/Users/igal/malwares/bumblebee/21-02-2023/archives//archive20.gz
[+] gz archive was created in:/Users/igal/malwares/bumblebee/21-02-2023/archives//archive21.gz
[+] gz archive was created in:/Users/igal/malwares/bumblebee/21-02-2023/archives//archive22.gz
[+] gz archive was created in:/Users/igal/malwares/bumblebee/21-02-2023/archives//archive23.gz
[+] gz archive was created in:/Users/igal/malwares/bumblebee/21-02-2023/archives//archive24.gz
[+] gz archive was created in:/Users/igal/malwares/bumblebee/21-02-2023/archives//archive25.gz
[+] gz archive was created in:/Users/igal/malwares/bumblebee/21-02-2023/archives//archive26.gz
[+] gz archive was created in:/Users/igal/malwares/bumblebee/21-02-2023/archives//archive27.gz
[+] gz archive was created in:/Users/igal/malwares/bumblebee/21-02-2023/archives//archive28.gz
[+] gz archive was created in:/Users/igal/malwares/bumblebee/21-02-2023/archives//archive29.gz
[+] gz archive was created in:/Users/igal/malwares/bumblebee/21-02-2023/archives//archive30.gz
[+] gz archive was created in:/Users/igal/malwares/bumblebee/21-02-2023/archives//archive31.gz
[+] gz archive was created in:/Users/igal/malwares/bumblebee/21-02-2023/archives//archive32.gz
[+] gz archive was created in:/Users/igal/malwares/bumblebee/21-02-2023/archives//archive33.gz
[+] gz archive was created in:/Users/igal/malwares/bumblebee/21-02-2023/archives//archive34.gz
[+] gz archive was created in:/Users/igal/malwares/bumblebee/21-02-2023/archives//archive35.gz
[+] gz archive was created in:/Users/igal/malwares/bumblebee/21-02-2023/archives//archive36.gz
[+] gz archive was created in:/Users/igal/malwares/bumblebee/21-02-2023/archives//archive37.gz
[+] gz archive was created in:/Users/igal/malwares/bumblebee/21-02-2023/archives//archive38.gz
[+] gz archive was created in:/Users/igal/malwares/bumblebee/21-02-2023/archives//archive39.gz
[+] gz archive was created in:/Users/igal/malwares/bumblebee/21-02-2023/archives//archive40.gz
[+] gz archive was created in:/Users/igal/malwares/bumblebee/21-02-2023/archives//archive41.gz
Extracting the Pieces of PowerShell script
Each archive contains parts of a larger PowerShell script. Here’s how I extracted and concatenated them into a single script:
import gzip


ARCHIVES_FOLDER = '/Users/igal/malwares/bumblebee/21-02-2023/archives'
OUTPUT_FILE = '/Users/igal/malwares/bumblebee/21-02-2023/powershellCommand.txt'

countArchives = sum(1 for file in os.scandir(ARCHIVES_FOLDER))

finalString = ''

for x in range(0,countArchives):
    with gzip.open(f'{ARCHIVES_FOLDER}/archive{x}.gz', 'rb') as f:
        finalString += f.read().decode('utf-8')

open(OUTPUT_FILE, 'w').write(finalString)
2074441
The concatenated PowerShell script contains numerous base64 encoded strings, which, when decoded, form an executable. Here’s how I extracted this executable:
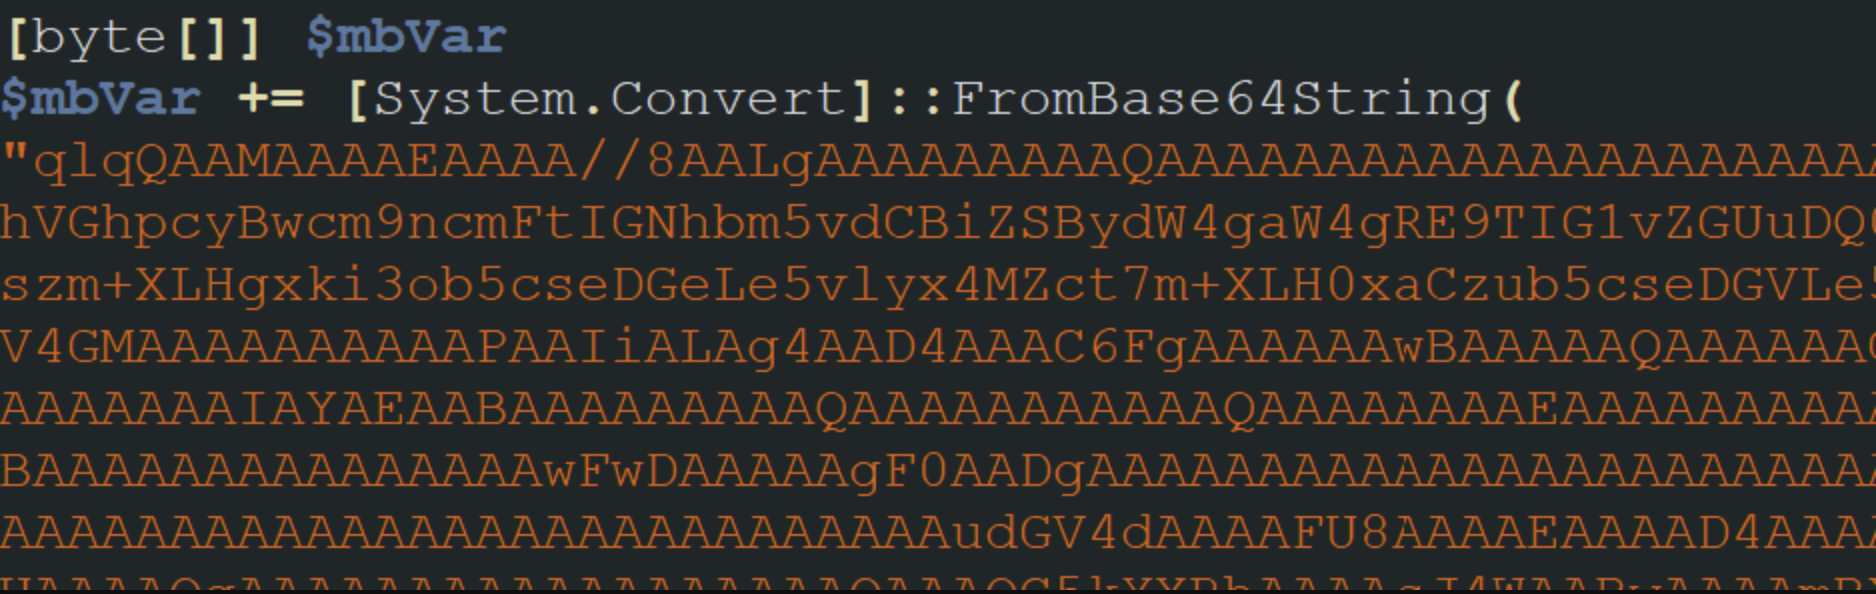
$mbVarps1FileContent = open(OUTPUT_FILE, 'r').readlines()
REG_PATTERN = '^\$mbVar.*FromBase64String\(\"(.*)\"\)$'
OUTPUT_PAYLOAD = '/Users/igal/malwares/bumblebee/21-02-2023/payload.bin'
finalPayload = b''
for line in ps1FileContent:
regMatch = re.findall(REG_PATTERN, line)
if regMatch:
finalPayload += b64decode(regMatch[0])
open(OUTPUT_PAYLOAD, 'wb').write(b'\x4d' + finalPayload[1:])
print(f'[+] Payload was extracted to the path:{OUTPUT_PAYLOAD}')
[+] Payload was extracted to the path:/Users/igal/malwares/bumblebee/21-02-2023/payload.bin
The extracted payload is a 64-bit DLL. Opening this DLL in IDA reveals that DLLMain executes sub_180001050, which contains an array variable with a pointer to an MZ blob and its size. MZ (the bytes 4d 5a) is the signature at the start of every Windows executable, so an MZ blob inside a DLL points to a second, embedded binary.
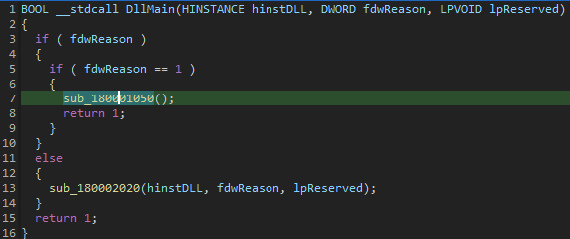
DllMain calls sub_180001050DLLMain will execute the function sub_180001050, which includes an intriguing array variable. This variable’s first value appears to be a pointer to an MZ blob, and the second value seems to represent the size of the blob.
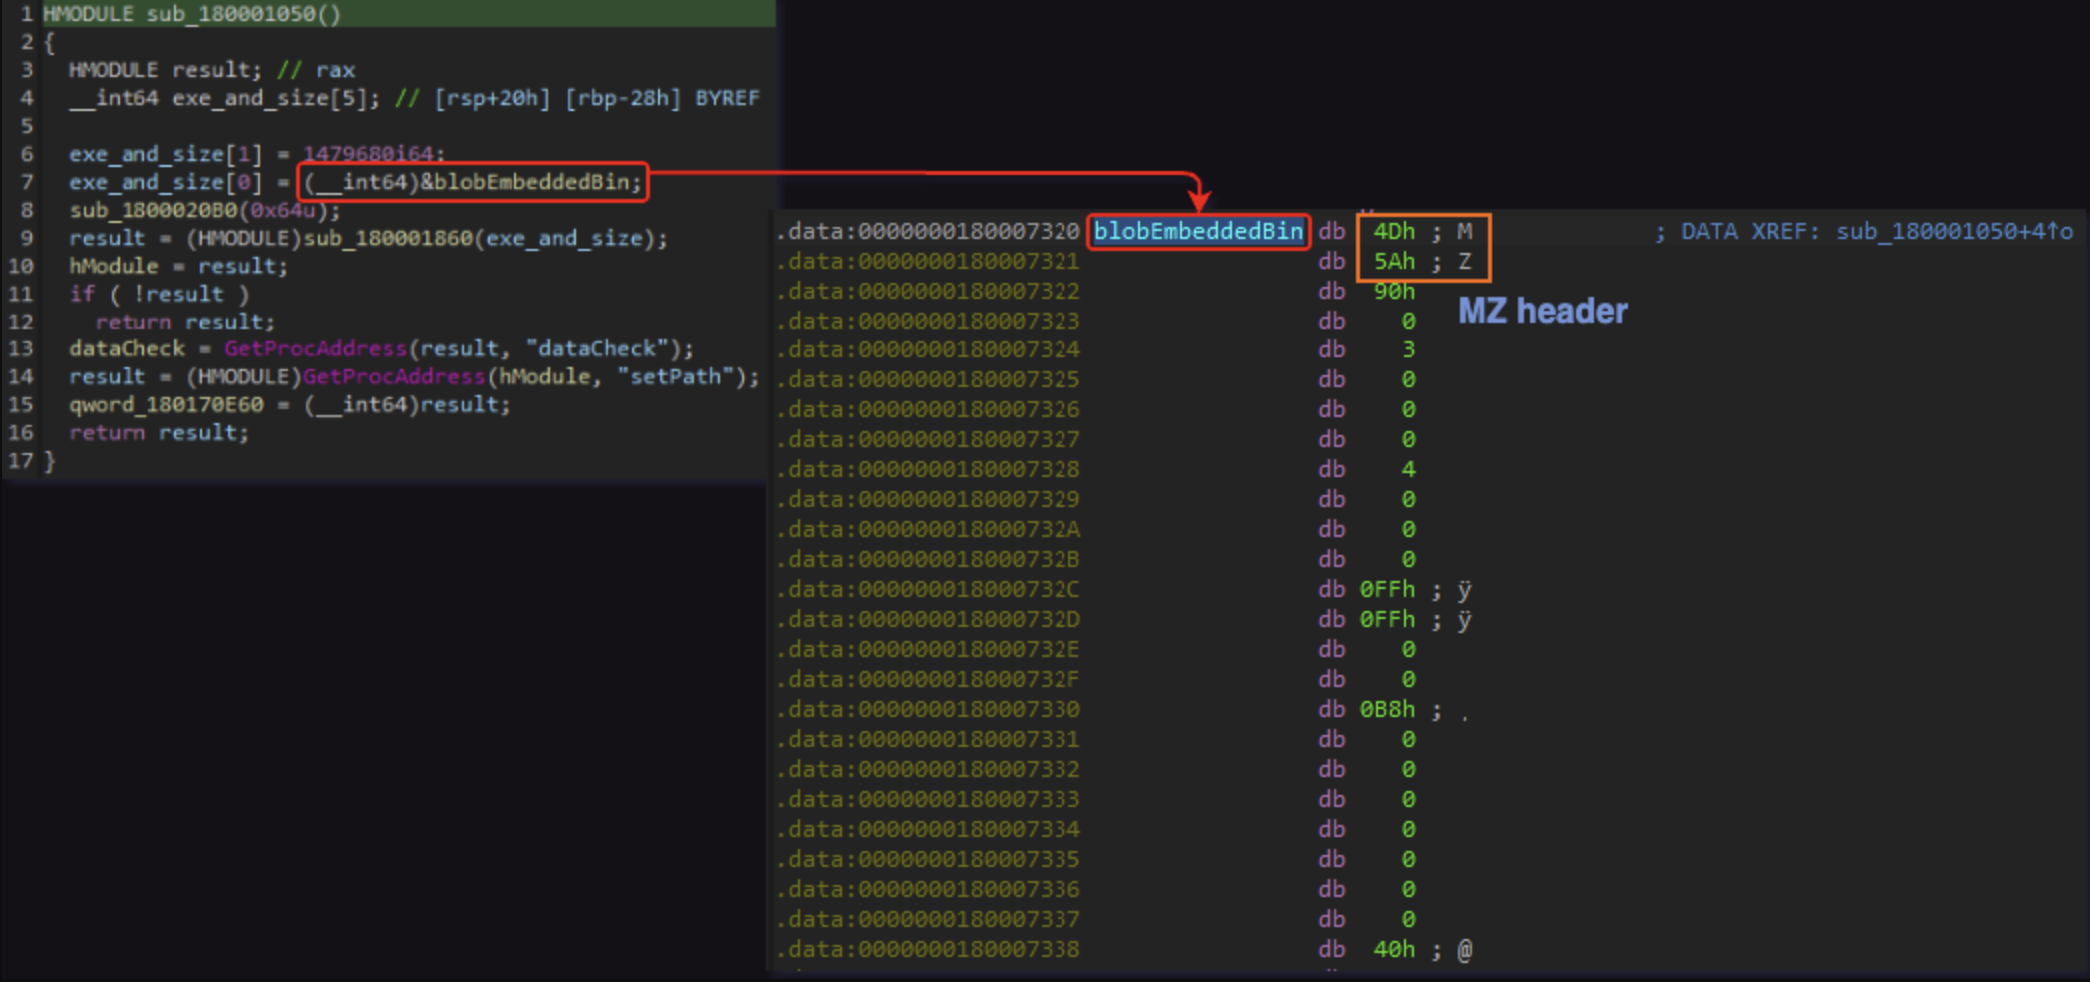
sub_180001050: a pointer to the embedded MZ blob and its sizeI took the starting offset of the blob (0x180007320) and added the possible length (0x169400) (wrote it in the IDA output window)
print(hex(0x180007320 + 0x169400))
And by double-clicking on the printed value it jumped to the offset which was the actual end of the blob data:
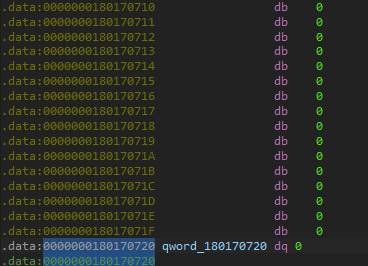
0x180170720Investigating the Embedded Binary
Using x64Dbg, I set a breakpoint at the array assignment of the blob and dumped the embedded binary for further investigation.
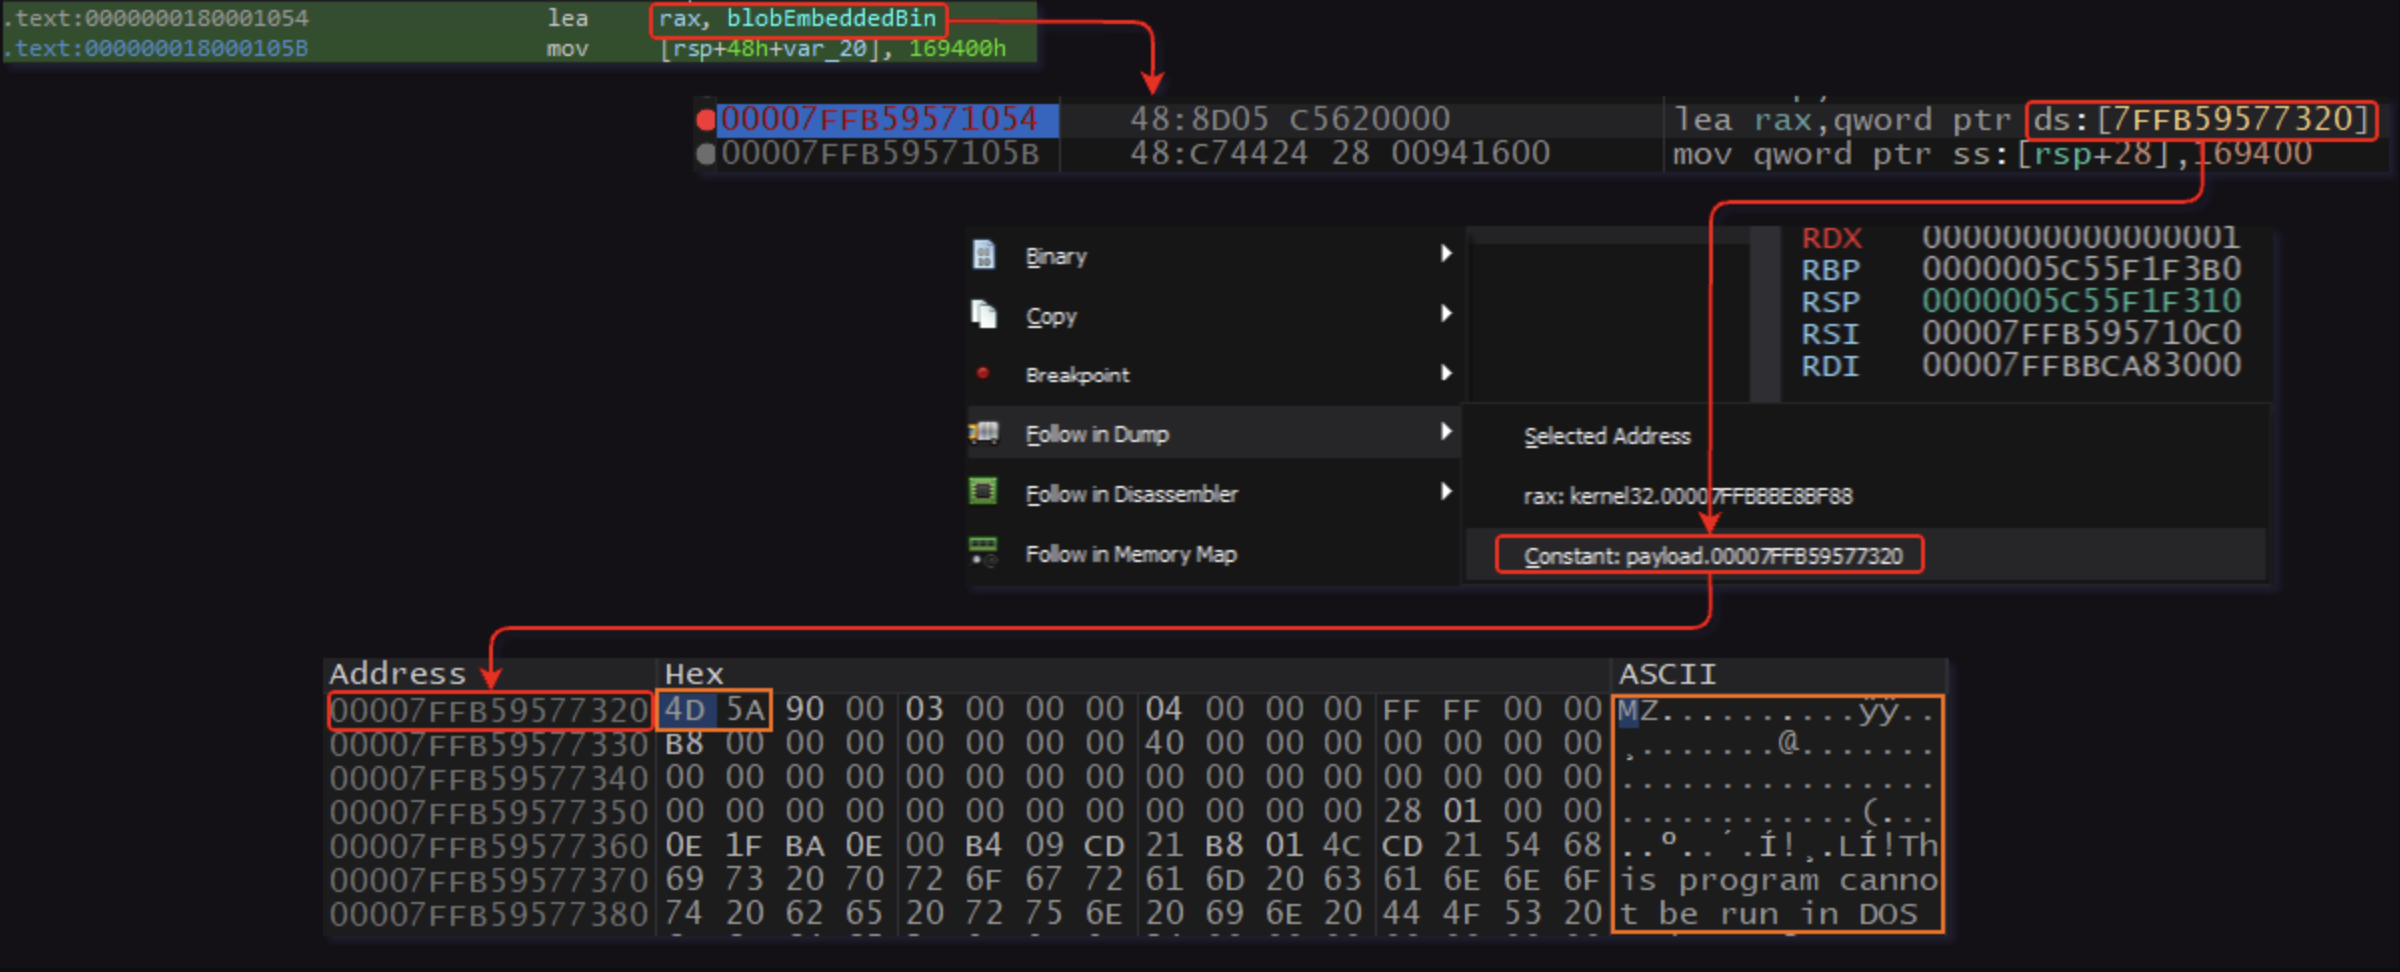
Now we can investigate the embedded binary.
Bumblebee Payload
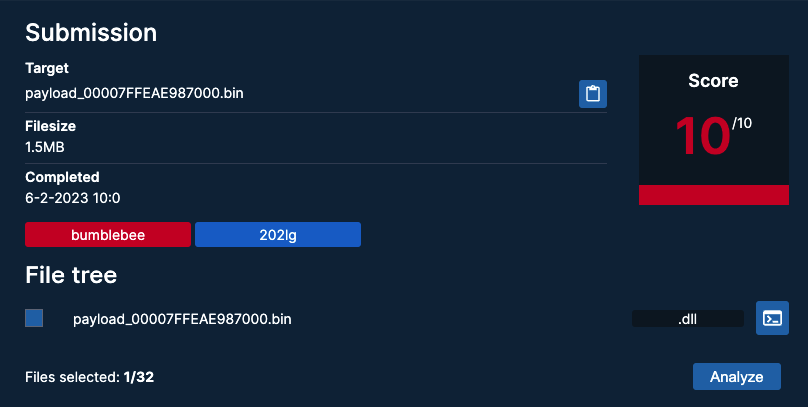
To triage the Bumblebee payload and extract encrypted configurations, I uploaded the payload to Tria.ge, which confirmed it as Bumblebee and revealed the botnet ID: 202lg.
202lg
mwConfigDecRC4 Decryption
The loader function uses RC4 encryption with a hardcoded key to decrypt the blob of data. Here’s the script I used to decrypt it:
from Crypto.Cipher import ARC4
import binascii

KEY = "XNgHUGLrCD"
BLOB_CONFIG_PORT = "0b002425baa537efd52cf61f683f8116bc994d01c892b9c140f4a29c3f8a0b823f5a65b8dc08bb73c1e7ec5f5cb40ca4a45ea741c5367ad2368ea826d4e90a4c2f986b4cfd78e1038028d261f872279b"
BLOB_CONFIG_BOTNET = "0d042549dda537efd52cf61f683f8116bc994d01c892b9c140f4a29c3f8a0b823f5a65b8dc08bb73c1e7ec5f5cb40ca4a45ea741c5367ad2368ea826d4e90a4c2f986b4cfd78e1038028d261f872279b"
BLOB_CONFIG_C2 = "0e00260b8b9306c1e418c531590cb72c8eae7f2dfaa38def77c38ca50ca439b30a60578eef248a43f5c9dd69649a3d9193709574f60c4ee605a2991fe2c7387e1bb6597ccd56d033ba1cea53d44012afc739f7fc6717d5691f8421ce19ceff182407a705418cd7b6ac92b685308988032dee724be6d2d897fdb031ca1fe74a115369eba75a7d1daa2cdab50ad2dc4920229b4a2d03204dff76d0787efee3b3f6129e23c56f0db2638f54548b8eeb0e33634b56f78e218b807a7d8088e19961165acaa738d226d897cdeb9ee1e1361a7f4eefbabbf8f3c4d4d23dc724df1db8b62a51edea15eaf11988094fc0d172e91da11c5121a0e663522d7a06e51ea6ddb531b4a89de69b8bb3a0622046d2bd26577e763a52bd55c9fc33855585a1cadd57f1167c3ce0a60068cc0aacfb5ddfa59baa6cae138f29e554ea51317e6f23f9a70339816c413b1b8501e2a1231b602666b3a561906f752cca682fd8c48c3256c148ccddb89e0199b2122fe3c06d8f23d727215431e8358692c59cf291d03eb57a92c0d031d604e79b10bd0c5231ccd940ab30ece0d0e33aa12062c0bc48bd49b223de7088768a9a3a890e1277bba2006b42eaedca10a57d85a306f8b3560b6f79a95e51732c109a26c47086f31ba8456cb182be49f2f2bf11d8fb1971e2b296495eb463a018612c4465ebbd0b097fd0c9566f75aa7c643926b4dd7966df75b5957445af826e48e0084efb68c73aaaed0dc2b47e7ef70673ee1d8c812bde7c77ba274b8348beceac7593dd444f513072ec832407173ccff8f46f1fa224bbe2f96990d41e837c37278688270e4c706085ec36c4802787c168637654543efccf22cd3a1b4561064c301d5fe5fa9add6281e396c7b6b6053a109a6e12cbb9b67b34559fb0cd8834136cec8ffca715cae19cf831d8f592ca87196008a89178522ccee395fbfbc1407843ddf216566a8cc35b05b548f09616aeb896757389e526744fb9f5a83e9f338d890418acb698fd882ea2acae9c82f5d943f579452ab185c2bb8f8a80eb294efd9b70636f0fadc1b8f5055e23dd9c6f5687e6f149797b71a95beeb6dc9f4dafa3a9d6cc8eb77557e87f09bf6f96f581dba6bf2f41c0641a43c065c992efd9df4b4a58ae807bbb46d3a83181705ebd3f95f3d869fb485ba7274526560dc2479a35c664fb55ae74612a767a5fc2b50c3034d5bab9092bccb4c9ad0bc5e654481e4e5b1f85f8a4fbe2cc26e1442a808bf6b5f90564733329b4a5a62d815175a15c8b4718f6c16d474957f014d2b930fd7eea94ce485d0a9ecbd36a0391205b4cecbe39b2e39ed4a7b1e2c3698b0a66ba9594fe35cd21abdb578c984bcbed482fce3f5bb209ed7f8e8009238656fd5eda5a5e2cfec507d065960a01d051f4f7af0378714c4fb8040a46fea6b74a6278f36cdac1867a7a429c4aff551a381df09492aeca2bfb3e0774a3160f21ad9b82a984590e7fa84b6bb01a0a59f882d316203c7d910a4c27a26d30babb8cbbf4997c47a5b3721c7fa578a0e458834bb27ffbe71d22ede304d8d89077e4d69dd7c215451cae24ebc9459d7e6ddbea97cd307fac9f9d8d0e4657528ce78054494b85f25b49bde3e691cfcd6c30015b241a782c9e78cd3c180db8a48625973490740b4fd3b435e1215339ae43ce15c984cf80d21666d46b55a99e51f676e12540074283c95ec682cdccf4e06c4336e03acd670123785bb42111d954737829a28170c52b9c8ce9c3a1df1547ae5fa63d8df26bc0262fb97be82adc1938fc19287d0704e36e7d41fcc86205bcc0d2dc4dfb4e1d304a44bc74e57346a5b92921c9828eac6612f2d0d7c7a2e168c4a77a0e4ef27928d201016c246a84af104396622d7d2cd59279aac6c35b50cfcb12990d323d8d03ca2d380d2058e00491ff410c478fda4eb77e59a1d611c8a2b12091c3515301d60ee95ce950aad32948924f87063860ea50820f4bffc88ceae22b403a7d13d8dd0644a68c6e1ce6fb13ed8381da44e2f1e263fba3440626de00a33808ceb4a4a548138ccab58f4e1b9fac1deab5e753fe3b851567d6f0c76f03d0461fbf64858abe8d59efe5175b28bc2c0c88eb16f8e7507ed16390f0a8161bf77db73b886907d266ad71666e166b084aa3e4be41bf4c86af2aea8d39c425fa76af5498bf4cf2a7c238ea34658302822e88ad5e807b1bbac59450ec7c3c0bd16fdc7220540148aaf1d9f11a8df7fae8131a1042c33541e396b875a3a7c05d0d3c485305feb036087d2d1115ae007c7133e3521e19c6a3fa885491d053cec36f979ae3c174082b19a33c4d0e3c0fe1cd7b76a1faaf2307180f7eb45e97390fb49a89ee2f05d36feac4862dee22df20aef615cc20c685b5052c681d402abbed1a528db0cae366ec8cd1ffa79920f55f3d7b51dd0f91fe339a0c2d94e179d26746d60311980b68782bda4b1dc9415a87bed64a97af03d2df234a73fa6e08e25c6d365c54c5b3223a7ed10d48713fa307fb9dced9e9fcb50050f60db52efd1c0affebddfd4f67ed9154a8607e3f4582a1bf45914e58953ad6d4d96201cc8633c05940a34de55d288eae99d3a7bb4a50621702e22816811a4ea8147f8dd6756462b21fd678e37b841d864c9033aab5a482398e23d643f42a1b11c866b69928e4478c89090e37c4f70bed141dfed9ea3df4c181de244452a185d76c715353ca0e33dcafb90fd9bb6642d5af89774e5fc8746ef8c68054bb392a90bd6d72967977554c39fbbaf9767295049c09c25bc82b1bb4f7fc3b83a02bf722b33a54332dfd0bae6aad5236db428e94eef3b76394e35aafab43a7ce376feced0b33c2a9d2d5fd77177745515df5d98124cde965e5177c4c064f94f92fe1b311c67aac88eaddc1bff648547d311c099b3560f40e244506d195aab67bf36b635ff7d30495a88b75864263f04004049d3580a41666a79f295acaebae1a0e4a916547e52287af8e0e7b49473918afff0f66cd4e19da9d043f8923aab8f4df541fc0e5a5409cf6a695039b52f1e1479fc20560e7a76dcf56dbd8c4e8c7864c5c48d3f777cd030ab40dd8e1935579c21552c2dd0bb05b71f8eeb9615dd969c860d273d3db1e02897d57485890d1970dcc1b5041ec40ed78849367d66d839c38f324e30211fd092fb54df386bd8b244e57fc233b3c970e9d387cce7cd4d1c807215ca1f9568be0a52767c2b98a0953ec514d52e4e5d8abef3c6d0940688e88b199833436048690dabb30bd602020edf380c7d997a39edc49909f0bf78da88e0e8d445c74bac96c5cd2e2d0aa14875a8b0c3c696ddbba8a3a9413427f8639219326eddc0c237f52c407d4dc5532e49577fddd20f949fdcc51e152231f0f1d6a4c4200286a74645d2b80782228abd2d19d56c3bb2d4a6bc370924c776ed1cefe2aa54dd7204fc6983eefaa523a9a40fbbc658fbc14f118e3464ca7a91de1b4c37c6299aee6c9921be8c13b4250ffe17b7225bf6c620c560333f0c7fbb1ca4438da82f1b200602c2c2b1a1f20b70f1a342df54c04acbada99b22e3211769c8ad317c4d70d86755868dbbbea185328539fa4082d27860bac3d96bc467958960ce9797c1c2989723e9f0c61c4da4fd2b4ef69e3538adf88dd8500f75c6f35691e9a7c8625b19d48ff9f13b5bbadf0a6c9cd913625f366bcf038be0fbde2bf68aa56b90e747e41c759ef200fae4ba87077f2c712091cd2b1d21cfc87125db90f61483985276e1abad88a36bb16336cad2ae5728300aa64527447c7445c99e1f64eb2fa6f3fd036fa684b1e116c0f2d88f809d641903a477e1e25abe2cb9a8497a27602295e55ce20257f83496b74d3897787ffb4a50f3f076f83017f5c4144841fa70b5e88697afb0e7a6b98b2a487d00de2eab366389682165fb20c27c0aaf14a03ab46b0a622c0ac3e90f58e505f1caed2738b69f2b992f8026e35ea5b594545dccdffa1d1c9c22e692ad4940c42821821aa0f28abf72010c4655bd46bf703cbc26fa83665df8b08bc144227d241f49877f38d424db6bfc64f61b8fd1edd4dcc353a38c60a8671fff32a39dec6c2cbafd5344d7393ded7faec3520d605d420bad79b8a1c7103d9a924c9ece97c77d6bd63b7318f8d903126cec0e24e9a13c3b935180e7b61d78d42e5dcdc9a5efce858bfd068ea9e2c5ec036eb29e5204084d496167822341375e1b45f9fb6e2a34f2a29fd217a748a6d2c469c28943b84cd9d7f7c711068d1da87e41d7e27bb395dbc5515d1a0f9d4eff78cbc4e7a66abf3bfacc073b35e98e4bacdd9e967d3e5db5fcb1ad9f69b67e0cebefe984b604a02f48f5d03cd5c3459f111514499679d4cbf3e245fdf6560b8d94ce998b186b0f31526ecdf9ca49c5c6dd3fc3084488d2140d0ffa2165a4e26f54a3de813bb01b42510898520aff1cc727a21430addec70dbf8b9b86ddc720017d6beb4f807bc2295d00108eb84bdd3c70f8c7320130781bb755fcf95afecaf4446edb59b800f6aee2bda11f237ee6540d09008713a31cf8bd3067f3dc0b71f2ba4b225799729f5987911308d6086f9ed1ea6344aaaea794cbb63f15197bc8df2957d775f9db43b6669cf7d128ebc4ee38d90ac32d1fa22f06ec595201c52469259cb054761b583cb8cf30856aaca94946f076d39fb8995e43733d311d51dafcaffaa42ecec44bf74749fa36d5b4bfd8f1229af37d6794d53f234ad1e434c3388fef13a4a1030c0aa5050ff46152f2d858cfc8f464cceb33887ed950a117589474a70eca2a0b419adfd8de8e492b65efd3f9da0fc31b69bd1808dc8108a598229d43e0e86c3bdfb3cb4e6ad7921b07a3c4f3918ab44d95424c2061ece4f5f5004500503924b88e4e9846a1194d3f70c690abc78b3ea894a3fd3a08785856e9056a36699c585eae0221eda810e32deaae3a44ccbfefb387c78096a650301eb6b5387501d554d0eba6e6ceef514d3a42050c0cf150658f4fe6dac85ef5b6d3440c88308a8137e92f5bf3025cce853f7bafce424232a6899a95060e401db71249a3d6d4f62ed64e30ab78149f4cfd32833d11798142ce1c80ba76ea9894d21247836ee9339754497e0253ed62016de1ef1ae91284cfe7c51d88141c4376c9b405cf1e927a1420a38b6c9ac15021810968c6406f9b41ec869421262c2efe0806b6ac2ff329a8cb688326bdbfcbdf123d88fece510c2f211e823fcbfb7e4160a486383320389a4bad5197eb50fdc04c5d2e2751e5a30aeef1a8af37b7e6b67e63ae22705dfbc78b19ed32e8d7cdbb1166b29f0428806f3b8e83440efd893525e7fefef10911cee4195f5bfa93f2b454112d47f436367a8e87f5e7780dc1ecbe202d52b398ec81eb51dd340b19992d45a0a2d6fae6538d3b6e68b9068d5af5037004c4175f291dea3aa35d172ad4bccee6858738011bae78f1a5ef4ee3de767996298a6278eea9d565b88f6f906f93ad80f0378be4f4d26f5eae0091f614add12fd7a96d531f2316a23af49b06b0363e88d2069aca3c335c8dc466cb281a55bfe7365e3755f3f93ba669c8350b7094764121bd5a6203dcb4fbcc75f1170a28fe35f03ddb000c72dca1e0024d61ea590f7067237f30fd997408230fac900755cda8e75a4492fb65d465df772ef0435d13084519abc405fc72a2e804b21361629643e1bbfbf8f232c389725c2cd7f7c8235a482ed4c328deb1e9149310fe4bad15cdf94019dca679f5f718d879c44a44c572f2bb9676086446ada3b67e5406d2aef8b6184b1e2a5bb6229158ee7bc4191e7bb4b7fdd54faf1892aa8b8"

def toRaw(hexVal):
    return binascii.unhexlify(hexVal.encode())

def initCipher():
    return ARC4.new(KEY.encode())

cipher = initCipher()
plainPort = cipher.decrypt(toRaw(BLOB_CONFIG_PORT)).split(b'\x00\x00\x00\x00')[0].decode()
cipher = initCipher()
plainBotnet = cipher.decrypt(toRaw(BLOB_CONFIG_BOTNET)).split(b'\x00\x00\x00\x00')[0].decode()
cipher = initCipher()
plainC2List = cipher.decrypt(toRaw(BLOB_CONFIG_C2)).split(b'\x00\x00\x00\x00')[0].decode().split(',')
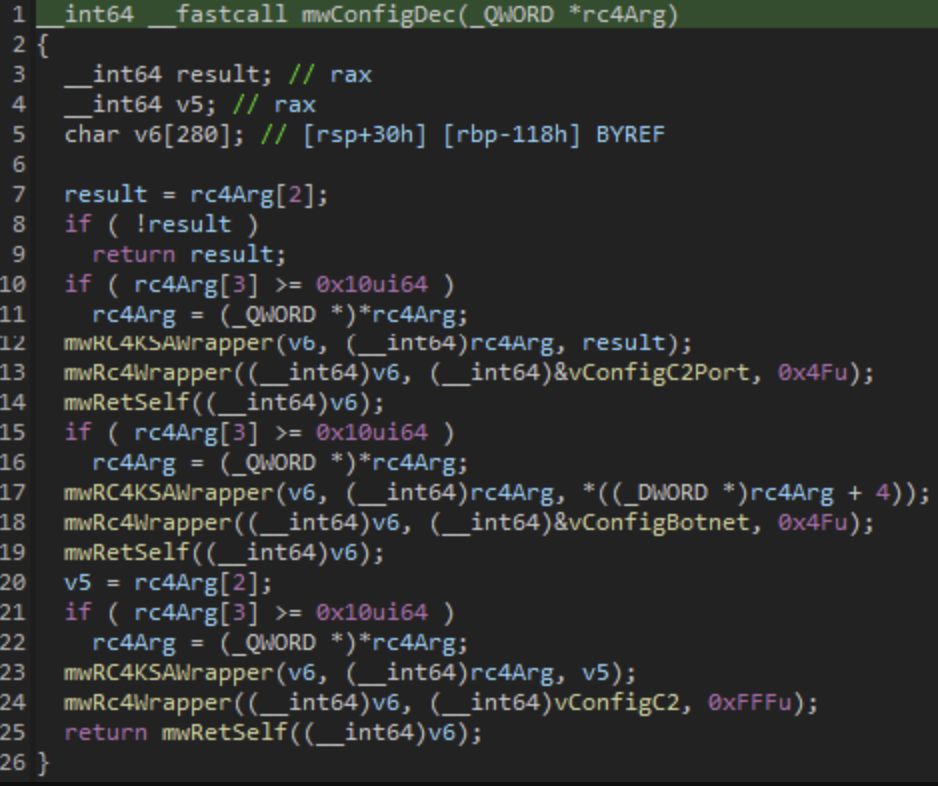
mwConfigDec: RC4 decryption of the port, botnet ID and C2 listContext
RC4 is a stream cipher: the key initializes an internal state that produces a keystream, which is XORed with the data, so the same operation encrypts and decrypts. Malware favors it because it takes only a few lines of code, but with the key stored in the binary it hides data from casual inspection rather than protecting it. The state advances with every byte processed, so data encrypted from a fresh key schedule has to be decrypted from one too; that is what the repeated initCipher() calls in the script do.
Indicators of Compromise (IOCs)
| Indicator | Value |
|---|---|
| Email Subject | Your Invoice Is Ready For Payment |
| Email Content | Contains a link to download an archive from OneDrive |
| Archive Password | RD4432 |
| Downloaded Archive | Contains an IMG file with hidden .ps1 script and visible LNK file |
| LNK File Execution | Executes a PowerShell loader script |
| PowerShell Loader | Contains multiple base64 encoded gzip archives |
Conclusion
My analysis of the Bumblebee campaign impersonating DocuSign highlights the sophisticated techniques employed by attackers to trick users into executing malicious scripts. By understanding and identifying these patterns, we can better protect against such phishing campaigns and mitigate the risks posed by similar malware loaders.
Co-analysed with Igal Lytzki.